
Congratulations on needing a National Provider Identifier (NPI) number! Because this clearly signifies an advancement in some form for you. The document itself is not so long, but some questions may be viewed differently, depending on each provider’s background. The goal of this post is to provide a step-by-step guide for first-time, individual online applicants to ensure a less stressful NPI application process. Unlike many other professional licenses, the NPI application is FREE! And your number would be available to you within 5-15minutes after application submission (for online applicants).
Contents
- NPI Application: Ways to apply
- NPI Application: What you will need
- Step 1: Apply for your NPI number
- Step 2: Sign up for a CMS account
- Step 3: Return to NPPES to resume your NPI application
- Step 4: Complete the Health Information Exchange (HIE) page
- Step 5: The Taxonomy page
- Step 6: Contact Information page
- Step 7: The error check page
- Step 8: Certification before submission
NPI Application: Ways to apply
There are three ways that you can apply for your NPI number:
1. Via online at National Plan and Provider Enumeration System (NPPES)
2. Via mail by completing, signing, and mailing a paper NPI Application/Update Form to this address;
NPI Enumerator
7125 Ambassador Road, Ste 100
Windsor Mill, MD 21244
3. By giving permission to an Electronic File Interchange Organization (EFIO) to send application data through the bulk enumeration process. (This is often the case when employed by large organizations).
The online application is mostly recommended because it is quicker and easier to track your status. It also affords you the opportunity to update several of your information on your own time.
What you will need:
- Your PERSONAL email (not related to your job or school such as .edu, .org)
- This will save you the agony of losing relevant information and communications in the event of a separation from your school or employer.
- A JOB (employer or business address needed)
- see the previous post on why you should not use your home address in your NPI application, except your home address, also serves as your business address.
- your State issued professional license (for nurse practitioners [NPs], this would be your State issued NP license number)
- CMS account (or sign up for a new account)
Step 1: Apply for your NPI number online using this link, https://nppes.cms.hhs.gov/#/
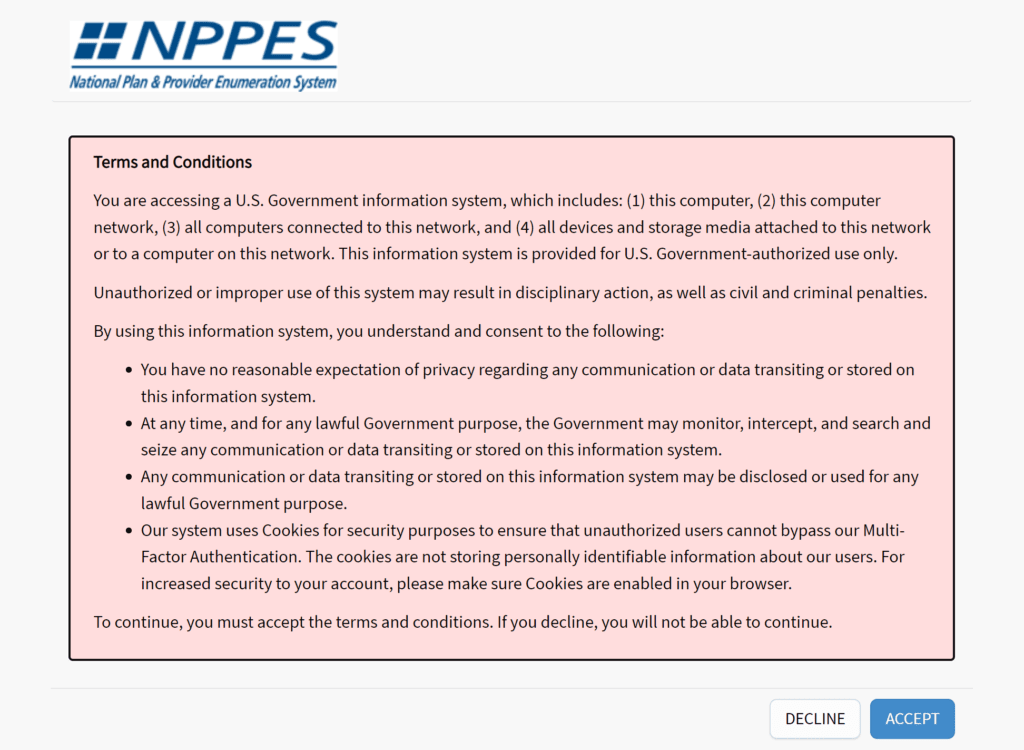
- You should see a home page similar to the one below.
- Click the “Accept” button to proceed. The next page should look like this:
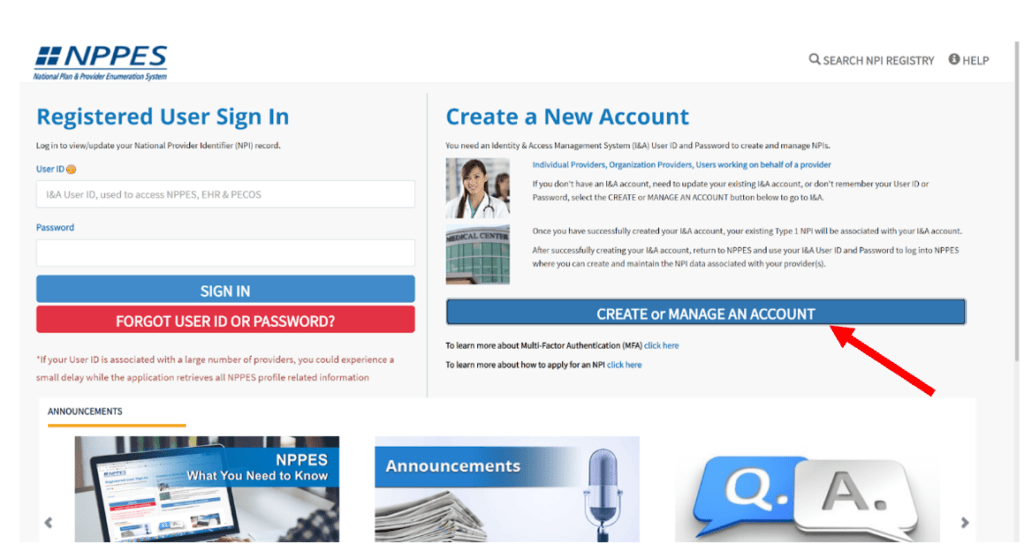
The above is the home page for the National Plan and Provider Enumeration System (NPPES) which is responsible for assigning NPI numbers to providers. It is controlled by the Centers for Medicare & Medicaid Services (CMS).
If you previously created a CMS account, move on to the left-hand side and “Sign-in.” If you have NEVER signed up for an account, click the blue button that says ” CREATE or MANAGE an ACCOUNT” (see red arrow).
You will receive a Notice saying you will be redirected to create an account. Click “OK” to continue.
Step 2: Sign up for a CMS account

You will be redirected to the CMS website to create an account. But first, you should receive a “Terms and Conditions” page. Click “Accept” to now proceed to the CMS home page as seen below;
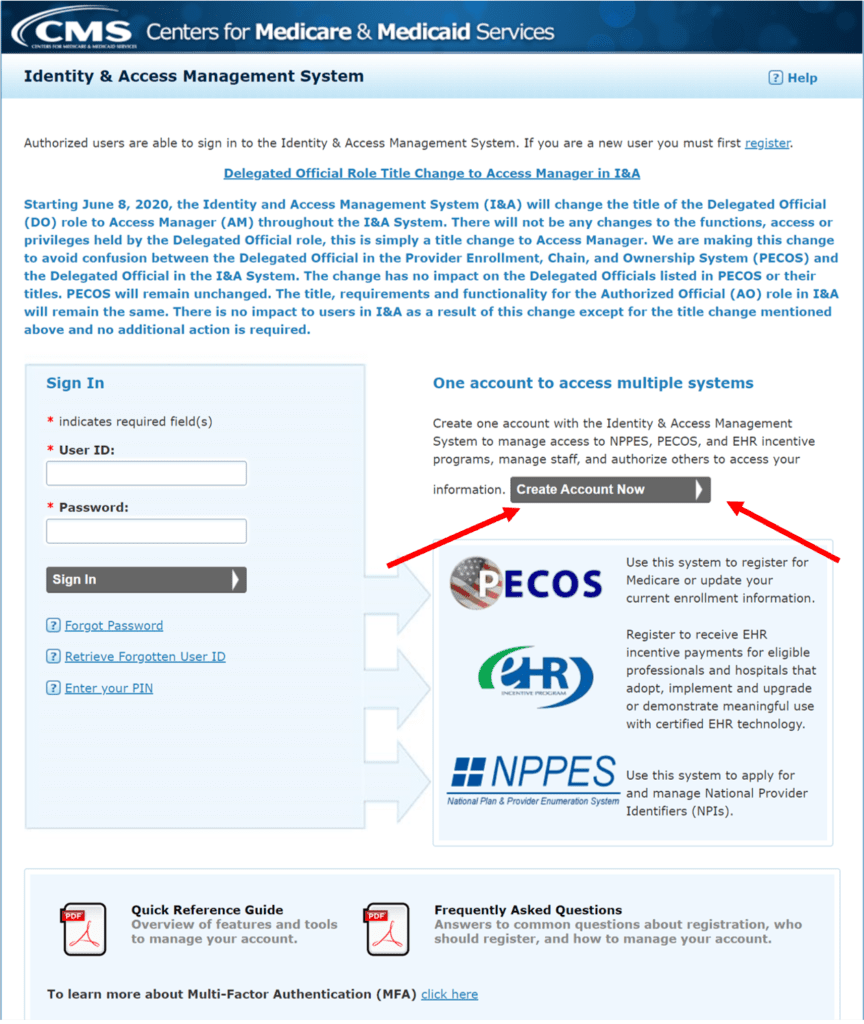
Once on the above page, follow the red arrows and click the “Create Account Now.”
The next page should look like the one below;
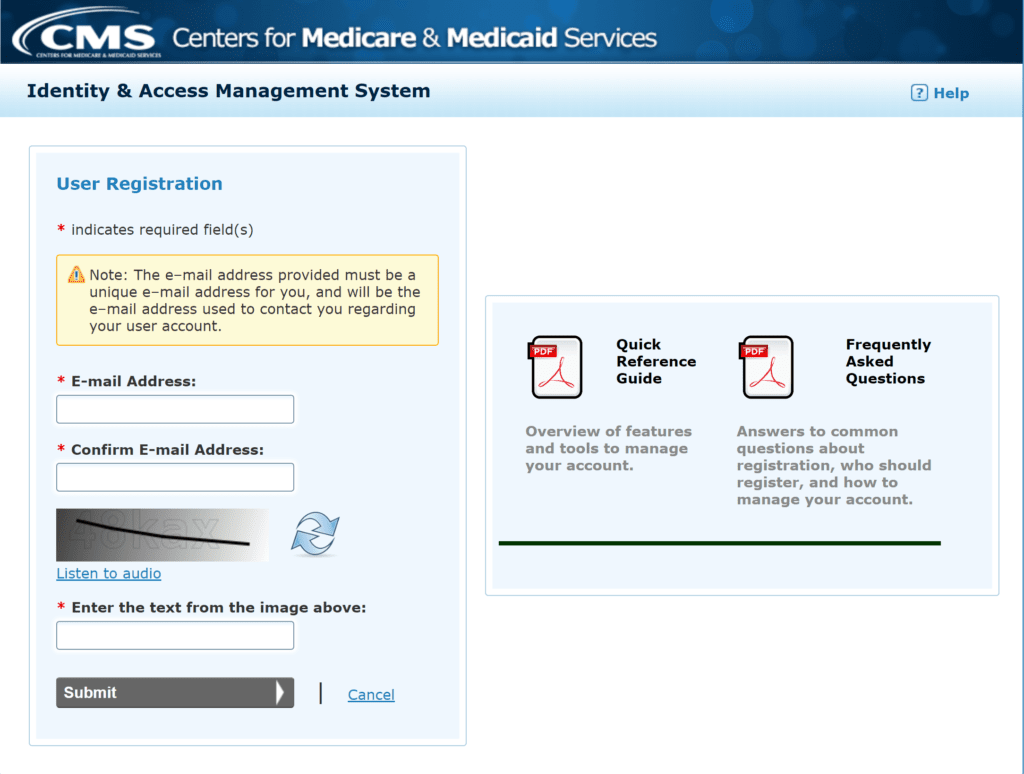
Follow the prompts and set up an account. Once your account has been successfully created, you will need to return to the NPPES site to continue your application.
Step 3: Return to NPPES to resume your NPI application
This time, you will fill in your User ID and Password, then click Sign in.
Once you have successfully logged in, this is the page you should see;
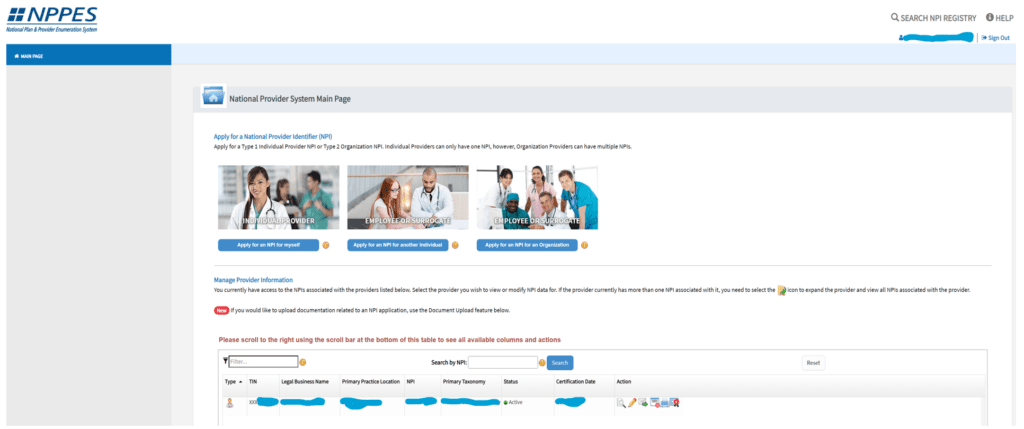
Next, click on the blue button for “Apply for an NPI for myself.” This option allows you to apply as an “Individual Provider” for yourself and by yourself.
For an explanation of the other two options, click on the round yellow information button ( ).
).
After choosing to apply for yourself, the next two pages that would show up are focused on your personal information (name, DOB, address, e.t.c). Once you have completed them, see my further instructions for the remaining pages starting from page 3.
See the image of the completion tracker. below
NPI Application Completion Tracker
Step 4: Complete the Health Information Exchange (HIE) page
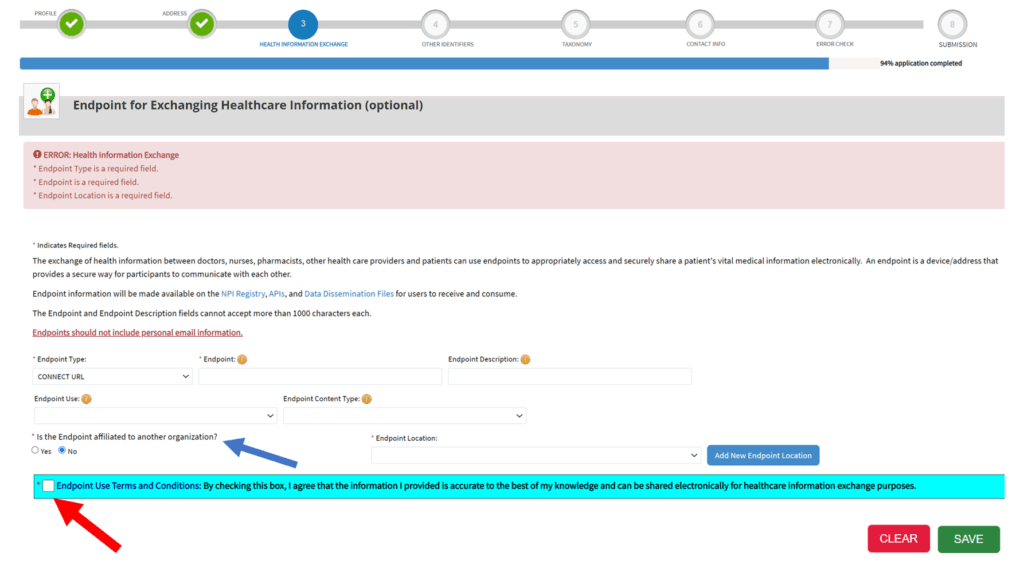
This Health Information Exchange page is the singular page that can bring your NPI application to a standstill. For new applicants and newly employed providers, chances are, you have not received your work email yet. To avoid unnecessary delays to your application, JUST LEAVE THIS HIE PAGE AS IS (blank). DO NOT check the white box (see red arrow). The last question indicated by the “blue arrow” is set to “No” by default. Leave it as it is. If you notice it as a “Yes” you can change it to “No.” DO NOT click “SAVE” because you will get an error message, and not be able to proceed. If you already filled in any response(s), erase them all and scroll to the bottom of the HIE page, and click the “Next” button
Additional instructions:
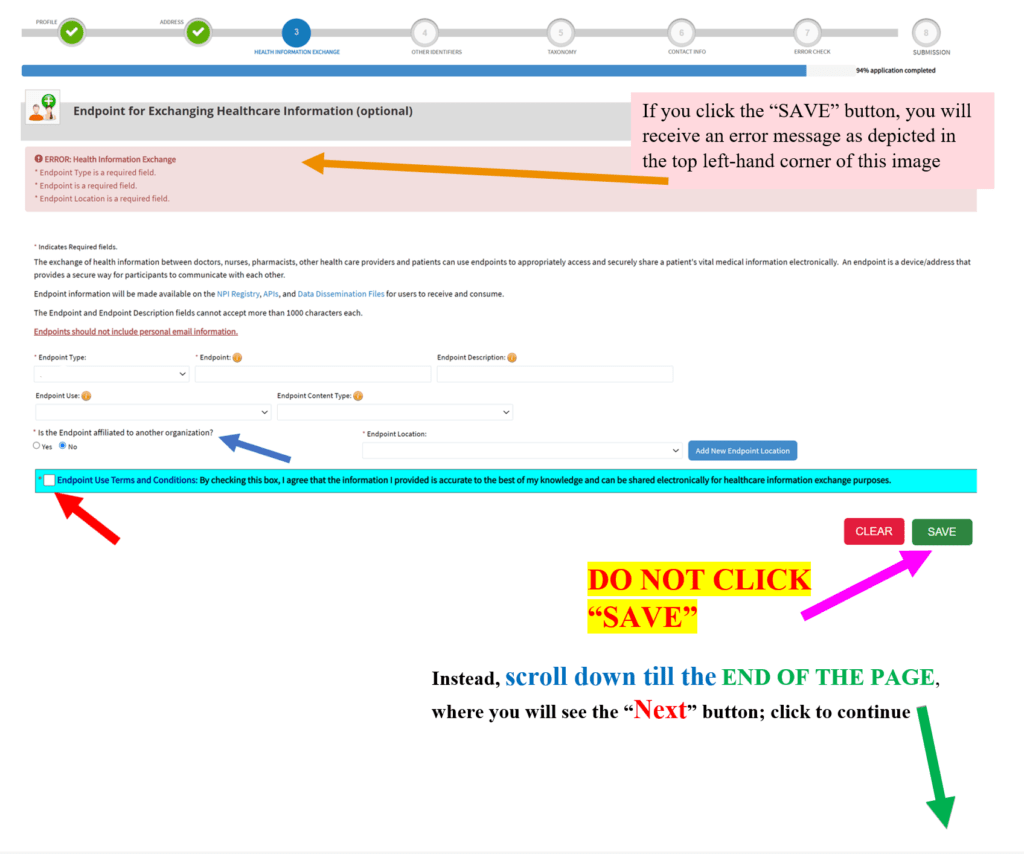
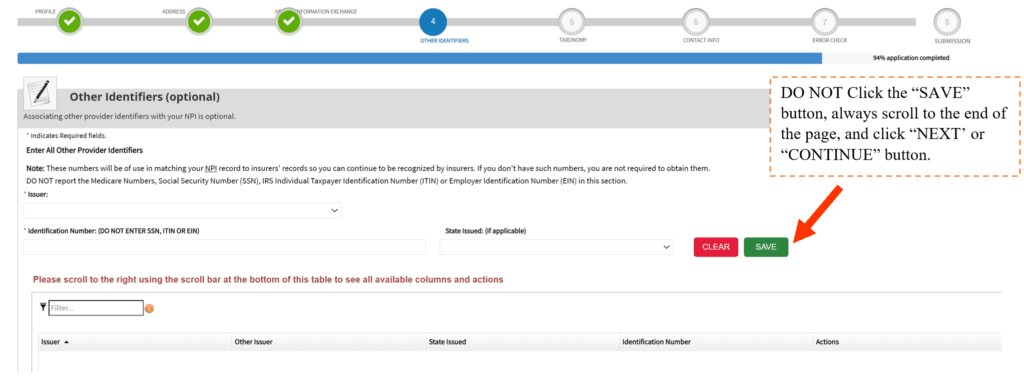
The next page is an optional page. I will attach it for your review. It is important to avoid clicking the “SAVE” button. Always scroll to the end of the page and click the “Next” or “CONTINUE” button based on availability.
Step 5: The Taxonomy page
This page requires you to identify your Professional specialty. Since many medical professions have specialties/subspecialties, you should strive to choose the Taxonomy group that most closely aligns with your professional license or specialty of practice. Always remember to scroll to the end of the page and click the “Next” or “Continue” button.
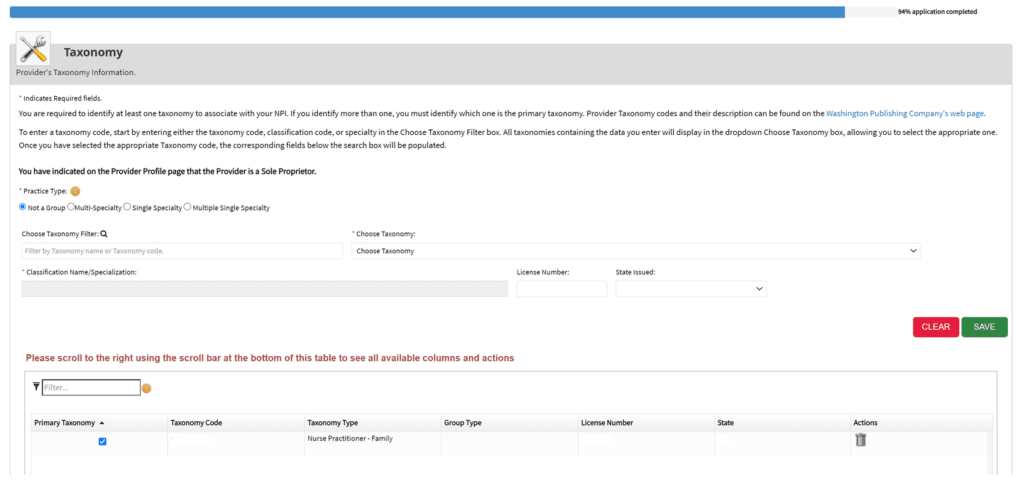
This second page below is filled with directions on how to successfully complete the page.
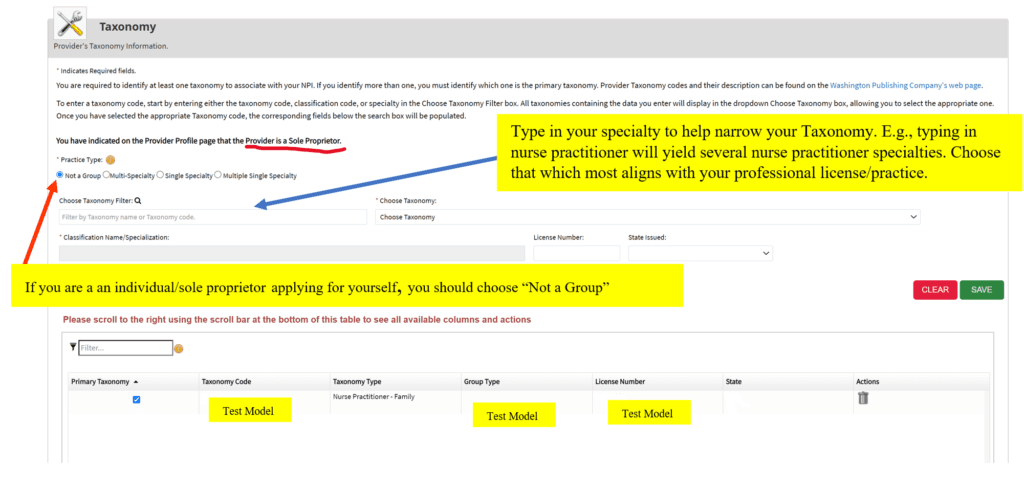
Once you have successfully selected your taxonomy, the remaining boxes will populate based on your selection.
see below for additional examples:

Step 6: Contact Information page[ps2id id=’contact-info’ target=”/]
This page would remain one of the most straightforward. The goal is to ensure the accuracy of your “personal contact” information. This is important in the event that the NPPES Team needs to reach you for any concern or clarification.

Step 7: The error check pag
This page is a summary of all the pages that you have completed. The pages that have no errors will be highlighted in the color “green.” While those with errors will be highlighted in “red” color; these will need to be revised and the errors corrected. You will not be able to submit your NPI application if any page was highlighted in red. In a situation like that, click on the red highlighted page and you will be automatically redirected to that particular page. The Test Model depicted in the image below has all pages highlighted in green.
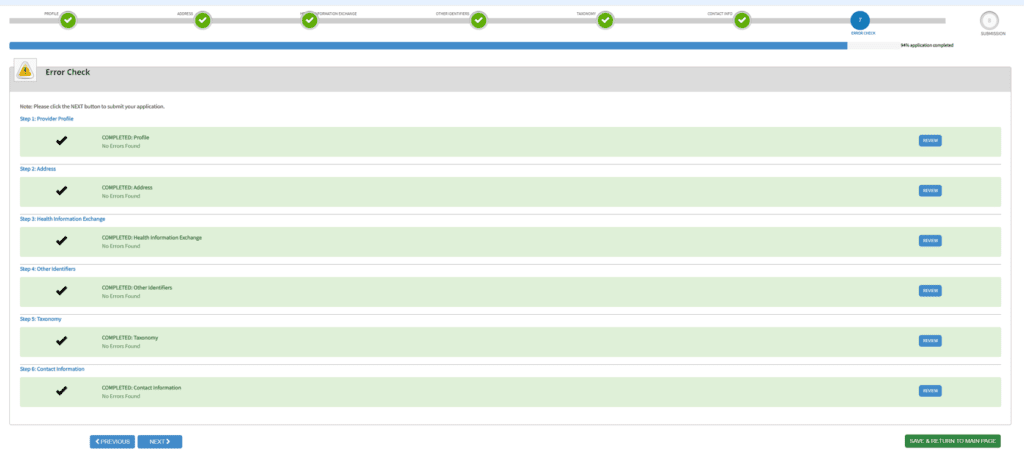
once you have all your pages highlighted in green, move to the next page to certify all your entries before submitting your NPI application.
Step 8: Certification before submission[ps2id id=’cert-submit’ target=”/]
This page requires you to confirm that you have truthfully provided all the requested information. Check the white box on the bottom left corner, and click the “SUBMIT” button.
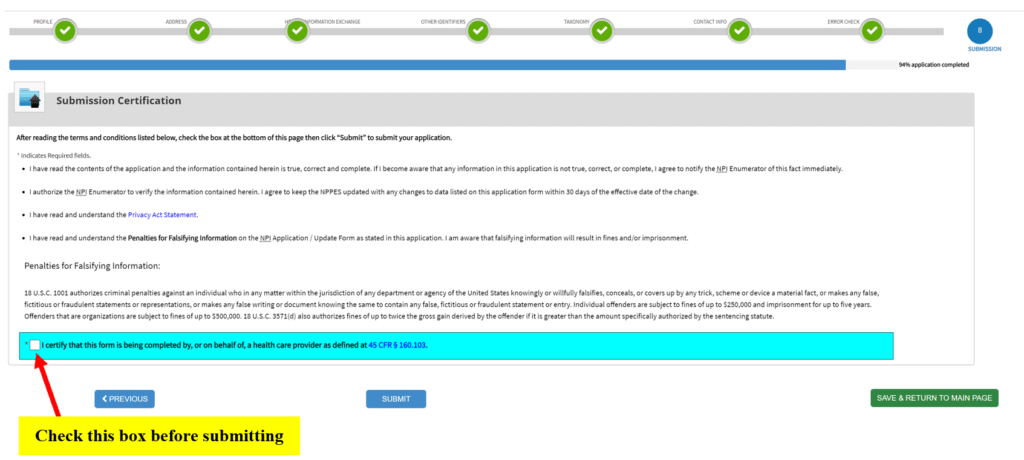
After submitting the above page, you will receive a “SUBMISSION CONFIRMATION” similar to this one;
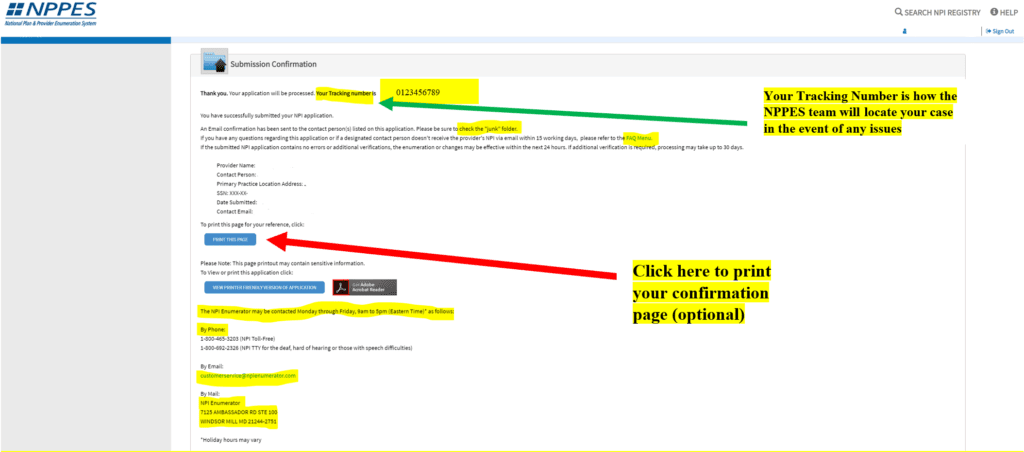
Congratulations on getting to this page!
A few more things:
-
- Print your confirmation page (see the red arrow)
- keep note of your tracking number (green arrow)
- Check your email within the first 1-2minutes after submitting
- They really do send out the confirmation email fast. If you can not find it in your primary email folder, head over to your “junk” or “spam” folder to search for it.
- If you did not receive a confirmation email within 30-60minutes from the time of submission, call or email the NPPES team (see above for their contact).
- They really do send out the confirmation email fast. If you can not find it in your primary email folder, head over to your “junk” or “spam” folder to search for it.

1 Comment
I just passed my nurse practitioner board exam-what's next? - DR.NPJO: Nurse Practitioners-Knowledge, heart, health, love, and support
[…] or advanced practice license from your state BON and have secured a job, proceed to apply for your NPI number. You can read up on NPI with this post. It may not be possible to obtain other professional licenses […]